 |
            |
 |
| 1. I prefer to add the wings near the end, & start with an almost complete doll, but the choice is yours. |
2. I have created several colour palettes that you can use, but you are free to use your own colours, or use on of my other palettes. |
3. Create a new layer named Wings below your base by going to Layer/New Raster Layer... or clicking on the new raster layer icon on the Layer Palette.
Select the Paint Brush tool & set your Foreground to palette colour 1 (i.e. the darkest colour) using the Dropper. |
 |
 |
 |
|
4. Make sure your Paintbrush is 1 pixel in size. Draw in the outline of the wings. This can take a few tries to get right. You only need to one wing as we will duplicate it later. I find it helps to Zoom in on the image & use precise cursors for this. |
5. Use the Eraser & Paintbrush to tidy up & streamline the wing. Ensure that it is not more than 1 pixel thick at all points. | 6. Using the Paintbrush, colour in the interior of the wing with a lighter shade of the outline colour. |
 |
 |
 |
| 7. It is easier to draw the rest of the wing without the doll in the way, so hide all layers apart from the wing layer. | 8. Complete the rest of the wing, if needed. |
9. Click on the Smudge brush. Set the Size to 1 & Opacity to about 70.
Smudge one pixel from the wing outline into the interior of the wing to create a mix of the 2 colours. Then, either use the dropper tool, or hold down CTRL & move the mouse over the pixel of colour, to select the new colour. |
 |
 |
 |
| 10. Using the Paintbrush, shade the side of the wings. | 11. Repeat step 9 on the shading you have made into the interior. Select the new colour & continue the shading, as shown above. |
12. Continue in this way until the whole wing is shaded. |
 |
 |
 |
| 13. Select the Lighten/Darken tool. Set the Opacity to about 30 , the Size to 1 & ensure there is a tick in the Swap Mouse Button box. Draw in the veins on the wings. |
14. Create a new layer called Wing Detail. Select a colour to match your wings - either a lighter or darker shade, or a complementary colour.
Draw in some patterns on the wing. |
15. Use the smudge brush with a Size of 1 & Opacity of about 60 to soften the edges of the pattern. |
 |
 |
 |
| 16. Now, make very sure that only the Wing & Wing Pattern layers are visible. | 17. Press CTRL+A to select the whole image, then press CTRL+SHIFT+C to copy merged layers. Press CTRL+L to paste the merged image as a new layer. Press CTRL+D to drop the selection. |
18. Use the Move tool to move the merged wing into position over the original. On the layer palette, hide the 2 layers named Wing & Wing Pattern. |
 |
 |
 |
| 19. Make your doll layers visible again. | 20. Click on the Selection tool. Go to the layer contained the merged wing. Press CTRL+C to copy the wing, then CTRL+E to paste it as a new selection. | 21. Press CTRL+M to mirror the copied wing & move it into position. Press CTRL+D to drop the selection. |
 |
 |
 |
|
22. Select the Lighten/Darken tool. Set the Opacity to about 20, the Size to about 10 & ensure there is a tick in the Swap Mouse Button box.
Shade the area of the wings behind your doll to add depth. |
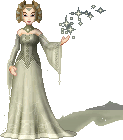
23. If you like, you can try dropping the opacity of the wing layer to see what effect that has. | 24. Your wings should be looking something like this. Add some faerie accessories & your done. |
 |
||
| Your wings are complete! |
||
| << back to tutorials | ||
 dolls bases resources tutorials contest links doll maker faq about forum guestbook